Red Hat Slippers & Red Hat Cake & Hat Box and Other Crafts including shawl to knit and hat band and boa knitting patterns.
Prep:30 min
Start To Finish: 2 hr 20 min
Makes 16 servings
1 package Betty Crocker® SuperMoist® cake mix (any flavor)
Water, oil and eggs called for on cake mix package
2 tubs Betty Crocker® Rich & Creamy or Whipped ready-to-spread frosting (any flavor)
Ribbon and edible flowers (dianthus, pansies, violas)
1. Heat oven to 350ºF. Grease bottoms only of 1 round pan, 8x1 1/2 inches, and 1 round pan, 9x1 1/2 inches. Make cake mix as directed on package, using water, oil and eggs. Pour into pans.
2. Bake as directed on package or until toothpick inserted in center comes out clean. Cool 10 minutes; remove from pans to wire rack. Cool completely, about 1 hour.
3. Cut 6-inch circle out of waxed paper; place on 8-inch layer. Cut cake around circle with small knife to make 6-inch round layer; place on 9-inch layer, attaching pieces with small amount of frosting.
4. Frost cake. Trim hat with ribbon and flowers.
Note: To add texture to frosting, gently roll clean wicker basket over frosting.
High Altitude (3500-6500 ft)
Make cake mix following high altitude directions on package. Pour slightly more batter into 9-inch pan.
1 Serving: Calories 420 (Calories from Fat 160 ); Total Fat 18 g (Saturated Fat 9 g); Cholesterol 40 mg; Sodium 220 mg; Total Carbohydrate 63 g (Dietary Fiber 0g); Protein 2 g
% Daily Value: Vitamin A 0%; Vitamin C 0%; Calcium 4 %; Iron 4 %
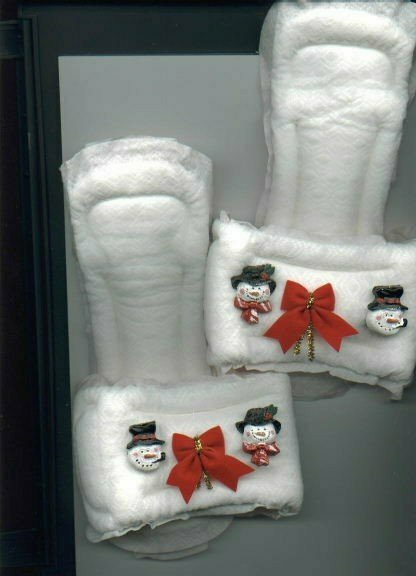
Fun to make at your next PJ Party
Easy to make. Take two maxi-pads and sew or staple them together as shown then decorate!!

|
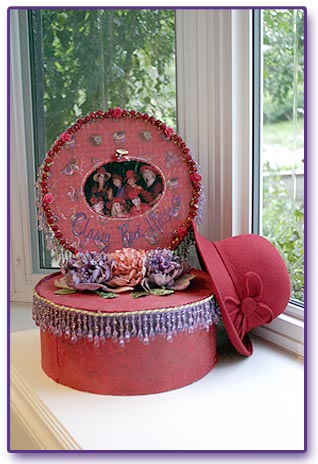
The Perfect Hat Box
Materials:
Support
the Sisterhood and try the following products from the Red Hat Society
Store: ·
Scrapbooking
Paper & Assorted Dimensional Stickers ·
Flowers
·
Ribbon
|
|
|
A
girl's got to have a hatbox if a girl is going to have hats! And with all
the travel opportunities coming up to attend RHS
Conventions, Hoots and Cruises, you've got to have a stylish way to take
your hats with you! Why not make your hatbox as personal as you are? The
same techniques used in scrapbooking can be used to make a fabulous
hatbox.
Instructions |
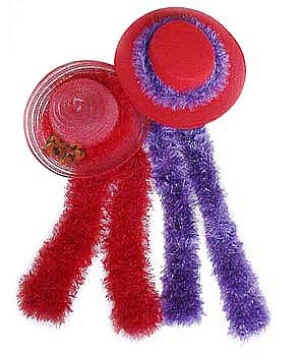
LION BRAND FUN FUR PATTERN BK4K-0505002 - Skill: Beginner
GAUGE: 10 stitches + 7 rows = 4 inches (10 cm) in Garter Stitch
(knit every row).
NOTE Use #113 red for alternate colorway
Make hatband first; scarf is worked from the balance of the yarn. Scarf
is worked is worked holding 1 strand of each color of Fun Fur (or two
of the red) together throughout. BE SURE TO CHECK YOUR GAUGE. When you match
the gauge in a pattern, your project will be the size specified in the pattern
and the materials specified in the pattern will be sufficient. If it takes you
less stitches and rows to make a 4 in. [10 cm] square, try using a smaller
size hook or needles; if more stitches and rows, try a larger size hook or
needles.
HATBAND
With 1 strand of each color held together, make a slip knot. Cast on 3
stitches – a total of 4 stitches.
Work in Garter Stitch on those 4 stitches until the band fits your hat
(generally about 21 inches but size will vary by hat)
Bind off all sts. Sew ends together, fluffing fur out of seam.
SCARF
With 1 strand of each color held together, make a slip knot. Cast on 9
stitches – a total of 10 stitches.
Work in Garter Stitch on those 10 stitches until approximately 1 yard remains.
Bind off loosely. Weave in ends.
Fun Fur Yarn: Sapphire 1 ball $4.99
1 ball 320-191 Fun Fur Yarn: Violet 1 ball $4.99
Scarf Knitting Needles Size 17 [13 mm] 1 $7.29
Large-Eye Blunt Needles (Set of 6) 1 $3.59
'ch-space' means 'space where ch was made in previous row'
|
4 balls Homespun® Yarn |
790-395 Homespun® Yarn: Meadow |
|
1 Lion Brand Knitting Needles - Size 10.5 [6.5 mm] |
|
|
1 Large-Eye Blunt Needles (Set of 6) |
|
|
• LION BRAND crochet hook, any size D/3 – L/11 [3.25-8 mm], for attaching fringe |
|
|
Skill Level: Beginner |
|
GAUGE:
12 stitches across and 20 rows down should measure 4 in. [10 cm] in garter stitch (knit every stitch on every row. BE SURE TO CHECK YOUR GAUGE. When you match the gauge in a pattern, your project will be the size specified in the pattern and the materials specified in the pattern will be sufficient. If it takes you less stitches and rows to make a 4 in. [10 cm] square, try using a smaller size hook or needles; if more stitches and rows, try a larger size hook or needles.
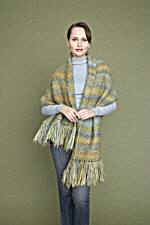
SHAWL
Cast on 60 stitches. Work in garter stitch (knit every stitch on every row)
until the first skein of yarn is almost finished. At the beginning of the
next row, attach a new skein of yarn, leaving a tail of both skeins.
Continue working in garter stitch, attaching the third and fourth skeins in
the same way. Continue until Shawl measures 60 in. [152.5 cm]. Bind off all
stitches. Cut yarn, leaving a long tail. Thread the tail into a large-eyed
blunt needle, and use the needle to weave the tail through the Shawl. Trim
end of tail. In the same way, weave in the tail from the beginning of your
work and the tails from where the second, third, and fourth skeins were
joined.
FRINGE Cut 248 strands of yarn, each 13 in. [33 cm] long. For each fringe, hold 4 strands of yarn together and fold in half. Use crochet hook to draw fold through edge of piece, forming a loop. Pull ends of fringe through this loop. Pull to tighten. Make 62 fringes along both short sides with 8 strands of yarn in each fringe. Trim fringe evenly.
Our group gives shawls to men, as well as, women. I thought that the fringe was a little too feminine for the guys. I knit a small band (maybe cast on 12 and knit 3, purl 3) until the length of the end of each side, and sew it on. It gives the shawl a finished look, and you don't have all that fringe to tickle you!